Pages

Sunday, March 13, 2016

Teaching is Passion: 2016 French Lick Blogger/Teacher Retreat Recap


Passion is more than a fleeting emotion.  It's more than what drives us or carries us through difficult times.  It's just so much more than that.

Passion goes deeper.  It is a flame that both consumes us and ignites us to go beyond the ordinary to extraordinary heights.

In its consumption it can drain us- of time, energy, motivation.  We can become so passionate that it can discourage us to the point of defeat when we surround ourselves with those who don't understand our passion for teaching or when we begin to play the comparison game.

Yet, passion is a great ignitor. When sparked by the right circumstance and the right tribe of people, passion can allow us to feel stronger.  Braver.  Prepared to take on the unique challenges that face us every day we walk inside those classroom doors.

I feel ignited.  Renewed.  Reminded.  After an amazing weekend spent with 200+ dedicated teacher friends, it's hard not to feel ready to conquer the world!
200+ educators, librarians, coaches, and more gathered
to reignite their passion for the best profession on Earth!
For the third year in a row, Brittany and I have been blessed to be a part of an annual blogger/teacher retreat at the gorgeous French Lick Resort in the heart of Southern Indiana.  Holly Ehle of Kindergarten Connections (link below) is the grand organizer of this event, but she is much more than that.  It is plain to see her dedication not only to her students and family, but to those of us who form this amazing network of teacher friends.  She created this event to give back to those who make a daily, positive impact on the lives of children around the country.  Brittany is Holly's co-organizer and does a fabulous job making sure everything runs smoothly.  I just feel honored to jump in and do what needs to be done for these wonderful ladies. 


Thank you Book Creator for personally
donating 30 codes for our FAVORITE app!
There are many reasons why this retreat is incredibly special each year.  Sure there are AMAZING donations from companies who love to treat and pamper teachers.  (Check out that huge list below!) This event simply couldn't happen without their generosity and support.  Of course there is delicious food, ice breaker activities, and a myriad of special touches that make this blogger retreat top notch.  However, it's not these that make this retreat significantly memorable to those who attend.

Teacher friends are fun.  They help us remember that we are
only as old as we tell ourselves!

Simply put, the best part of this retreat is the people. They are the heart and soul of what makes the French Lick Blogger/Teacher Retreat the best professional event I attend every single year.  I eagerly await those face to face connections with my teacher friends around the country and cannot wait to laugh out loud, share frustrations, act like I'm 20 again, and laugh some more! This year we had a like, totally radical 80s party for the evening event, and we had more fun than should be allowed!  I participated in my first ever flash mob and even sang karaoke.  When you are surrounded by people who encourage you, even if it is positive peer pressure, you are more willing to step out of your comfort zone!
#frenchlickroomiesforlife 

Something our roomies discussed at length throughout the weekend was our tendency to compare ourselves to everyone else.  In a world where social media is king, it's far too easy to get wrapped up in numbers. Numbers of followers, or rankings, or likes, or pins on a Pinterest board.

When you're standing in a room with your favorite tPt authors and seasoned bloggers, it is even more overwhelming and easy to feel so small and unspectacular.  However, when you meet these amazing ladies (and gentlemen), you remember that they are human just like you. They feel like a hot mess, overwhelmed, uninspired, and otherwise normal on any given day JUST LIKE YOU.
These ladies are what it's all about to me.
Denying self to help others rise to the top.
These ladies are from our home district and our neighboring district.
They push us, encourage us, and inspire us every day of the year!
We are in this journey of teaching TOGETHER. We aren't competing.  We aren't rivals.  As individuals we are nothing but silos who stand alone in the field collecting and consuming our expertise. When we meet together, we remember that we need to smash those silos and share the love and passion and knowledge we have for our field so that other children can embrace the joy of learning.

This, my friends, is what it is all about.  Connecting.  Sharing.  Learning.  Laughing.

If you have never joined a teacher/blogger retreat, I encourage you to do so.  You will not regret it!

Want to read more?


Monday, March 7, 2016

Stop Motion with the Lego Movie Maker App

*Note: Lego has unfortunately stopped supporting this app and has pulled it from the App Store. BOO! However, there is still value to this post as the idea can be applied to other apps!

For the last three years, I've allowed my students or club members to dabble with stop motion animation projects.  Through our experiments we have used a variety of stop motion apps and programs, but this year- thanks to a great colleague- I stumbled across an amazing FREE app that made the process more practical, less daunting, and more fun! The Lego Movie Maker app can be found on the app store, and this is one you will want to have on every students' device!

This app allows students a lot of flexibility and room to create while at the same time walking them easily through an otherwise tedious process of expertly stringing photos together.

For our most recent experiment in stop motion, the students had a variety of mediums to work with for their animation shorts.  Simple black background stations were created around the room using simple bulletin board paper, but students were free to enhance the backgrounds provided.  This made it easy to sort and separate groups working.  Students were asked to bring in Legos from home or other materials they wanted to incorporate into their work.  I also provided Play-doh which is a relatively inexpensive material that pairs well with stop motion (think Gumby).  Other items I typically have on hand include fishing line, popsicle sticks, glue, scissors, markers, etc.

Students can create with Lego Movie Maker in more than one way. They can either add images (called frames) from their camera roll, or take photos directly in the LMM app. I highly recommend students use the app to take all photos for a few reasons.  1) It has features that help students take higher quality photos such as an auto-focus tool, an "onion mask" which allows students to align photos properly, and a viewer/grid that keeps them cropped similarly.  2)  It's just a lot easier to keep all photos in one place!  One great part of being able to pull in frames from the camera roll though is the ability to pull in pre-made title pages or other illustrations/creations made from other apps.  For example, several of my students used Keynote to make slides that progressed their storyline.

The simple interface is easy for students
to understand and manipulate.
Students have the ability to adjust the rate their photos stream. I encourage students to play with this feature to find the effect they love the most.  Keep in mind the higher the speed, the smoother the finish.  However, the higher the speed...the more photos they will want to have or they will have a very short project!

Another great feature on the LMM app is their pre-made stock photos that really enhance students' creations.  These fun, colorful, comicbook-esque frames really add punch to a project and make it look more professional.  Students can also choose from a variety of filters to give their project a unique look and feel.

A movie isn't a movie until sound effects and music are added, right?  Thankfully the LMM app makes this incredibly easy as well.  Students have a lot of fun mixing sound effects and music with their projects to add that little extra bit of professionalism and whimsy.

If you aren't familiar with stop motion, there are several great YouTube tutorials available including one on the Lego Movie Maker app.  I also show them several engaging stop motion shorts and clips from the Lego Movie to give them ideas for their own projects.

I also give them these three tips when making their clips.

Creating can be noisy and messy, but worth it!
1. More is BETTER.  (The more photos you take, the better!)
2. Smaller is BETTER.  (The smaller your movement between photos, the better!)
3. Consistency MATTERS.  (Keep camera still and at the same angle. Keep your shots tight and on the subject matter.  Move your hand before clicking!)

Stop Motion encourages creativity and fosters
open collaboration with peers.


If you have a small person at home or a student helper, let them play with this app and watch them. You will learn a lot by watching!  So many of my favorite ideas come from watching kids play!

Happy Movie Making!

-Tiffany


Tuesday, February 16, 2016

3 Simple-but-Meaningful Ways to Augment Your Students' Reality with Aurasma


*Author's Note: This post was written in celebration of Digital Learning Day for the Indiana Office of eLearning. To read more posts like this from educators across the great state of Indiana, click on the image and follow their blog!

With Digital Learning Day upon us, you may be searching for something new to engage your students. If you're looking for a way to quite literally bring your students' learning to life, augmented reality is a quick and easy way to achieve engaging results. The Aurasma app makes application a snap, pairs well with numerous creation apps for some serious app-smashing, and provides an outlet for creativity unlike anything many students have seen before. The only limit to its use is the imagination of the user.

For those unaware of what augmented reality is, it's basically the ability to overlay video content on top of an image, or "trigger." When "scanned" by a device with an app such as Aurasma, the trigger will appear to come to life and show the video content tied to the image. For example, a poster of Michael Jordan may serve as a trigger that when scanned by a device loaded with Aurasma, will suddenly begin showing a video highlight of a monster dunk.  Sorry for the basketball imagery, but it is almost March in Indiana!
There are a number of worthy YouTube tutorials on how this app works, so let's focus instead on how to make Aurasma really work for your students. Quite possibly the greatest feature of augmented reality is its ability to transcend content and grade level. Simple enough for kindergarten students but complex enough for secondary, Aurasma fits the bill for teachers K-12.  


Here are 3 simple-but-meaningful ways you can use 

this app RIGHT NOW in your classroom:


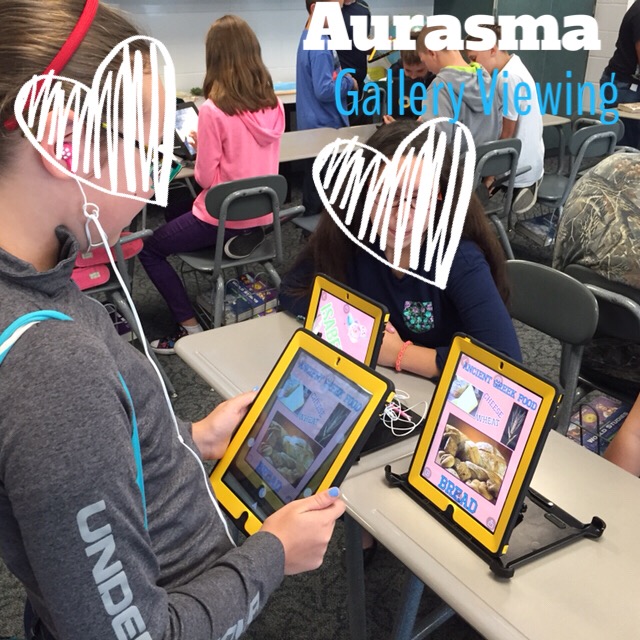
Student Work Galleries- Recently my students completed a multi-step project that required them to create a hands-on Medieval heraldry shield. Their shields served as a “trigger” for a Gami created by the Tellagami app.  In the Gami (a brief, animated video), students had to describe their shield’s symbols and motto.  These shields will now hang above their lockers for the remainder of the year and other students can scan them with the Aurasma app to learn more about their friends’ shields.  Apply this in your own classroom when your students create any sort of video project!  All they need to do is create a visual trigger that their audience can scan.  This is similar to QR code galleries, but with a much cleaner (and way cooler) effect.  My first grade daughter recently created an iMovie trailer for her favorite book as well as a persuasive poster enticing others to read it.  Her poster would make a GREAT trigger for her iMovie trailer!


Scavenger Hunts-  For an upcoming activity, my social studies students will learn about some really important Medieval kings...straight from their mouths.  Well maybe not exactly, but it will sure seem that way!  Using the ChatterPix app, you can take any image and make it “talk.”  For this project, I will be using the images of famous Medieval kings who will be reciting a brief bio about themselves. These short, 30 second video clips can now serve as your augmented reality overlays. Place augmented posters around the school building and watch as your students can’t wait to find out what information they will learn next!  (Recently you may have seen this technique if you follow Principal Gerry Brooks on YouTube!)


Flipped Learning Assistant- Whether you’re a big-time flipper or not, augmented reality can open a whole new world of assistance for your students at school or at home.  Math can always be a tricky subject for parents and students alike.  A math activity sheet can very easily become a trigger for helpful math, how-to videos created by you for your students.  For example, if you’re working on elapsed time, create an image on your activity sheet that when scanned will show students and parents how to solve an example elapsed time problem.  This takes flipped learning to a new level as students will WANT to scan those images for your videos. This eliminates the student excuse of having extra steps to access flipped video content.  You’re welcome.


This Digital Learning Day (and beyond), how will you augment your students’ reality?


Saturday, January 30, 2016

10 Ways to Use Tellagami Across the Content

Not all apps have the ability to attract the interest of both kindergarten students as effectively as that of a sixth grader.  When we find one we both like, it's worth writing about!

The Tellagami app is basic enough to be kinder-friendly, but versatile enough to challenge older students to create more complex digital pieces.  More than that, it has amazing capacity to be used across the content areas for everything from a quick-check activity to an end-product presentation.  

First we'll walk you through the features and then give you TEN great ways to start using Tellagami in your classroom.

App Overview

Tellagami is a paid app created by Tellagami Labs, Inc. that runs for $4.99 on the App Store.  If the budget is tight, the lite version of this app has enough features to create digital products worth your while. Customization and audio clip length are the only limiting factors between the free and paid versions.  However, we find that younger students especially do not seem to mind the limits of the free version.  Older students can find it a tad disappointing, but still enjoy the app enough to groan when told to switch it off.

The screenshots below give you a preview of the main features this app provides (all from the lite version).  This app basically allows students to create a "Gami" which lets them share an audio clip (30 second for lite, 90 for paid) while a customizable character animates against a selected background.  Students can choose from pre-made backgrounds to their own.  Basically anything that they can pull from their camera roll is fair game.  This leaves a lot of opportunity for students to app smash with any variety of apps they may have available.

Let's take a "picture walk" through the app features.

A simple interface makes this app perfect for younger students.

Note the use of graphics that even kinder kids can manipulate easily.
We all know that students inevitably will want to delete.
Note the easy to find reset button on the top left. 
Students can customize their character to match themselves, or
however they desire. 
A proven kid favorite customization is the emotion panel.  Bonus,
they tap quickly the happy and angry buttons the character appears to dance.
This is sure to get a laugh!
Students can customize their background by selecting the camera function,
a photo from their camera roll, or pre-made backgrounds.  Bonus feature:
students can doodle on top of their background within the app. 
The ability to share and manage workflow from an app is crucial.
Students can save their work to their camera roll and share it via LMS,
Google Drive, or whatever workflow app you use. 
Students can record audio, customize their "voice," and add text to their work.
This perhaps is one of the biggest drawbacks of the lite version.  Students only
have 30 seconds to record audio and cannot add text. However, students can work around
this problem by adding text in another app (whiteboard apps, etc.) before pulling
the image in as a background.  Tip:  Wear your ear plugs when letting your students
explore this app.  Trust us!

Sunday, January 24, 2016

STEM in the Social Studies Classroom


Isn't it funny how education likes to rebrand ideas?  One of the more recent suspects of rebranding is the idea of STEM in the classroom.  I'm pretty sure when I was a kid, it was just called hands-on science.

Moving on.

As a sixth grade social studies teacher, I thought I may find it difficult to incorporate STEM activities into the curriculum.  Surprisingly it's been easier than I thought.  After-all, the ancient Greeks and Romans were nothing less than innovative, impressive engineers.  Having the ability to combine such rich history with critical thinking skills typically reserved for the science and math classroom has been an amazing bonus this school year.  Throw in the technology we have access to and it's been an environment I could have only dreamed about three years ago.

Recently, I challenged my students to "think as the Romans do" and build an aqueduct that would carry water from point A (mountaintop), across point B (an arcade-Roman bridge structure), and finally emptying out at point C (Roman town).  I was so excited about this project, I had difficulty sleeping the night before!

The use of technology in this activity was instrumental.  Students had to complete research about Roman architecture and design, use the Sketchbook app to sketch designs, and in some way record the thinking and building process.  Hands-on by itself is good.  Technology by itself is good.  Together they are GREAT!

The screenshot to the right is basically the "script" we used to present this project to the students.  My "wing" partner and I (other sixth grade SS teacher) really tried to get into the role and play this up.  The excitement was buzzing before we even got started.

STEM is all about requiring students to think for themselves.  When designing this project, students were only given basic information and direction.  While we were on hand to facilitate discussion amongst groups, we were careful to not interject our opinions or guide them too specifically.  This was THEIR project.

Their successes.  Their failures.  Their learning.

Groups were given access to a wide range of materials to construct their aqueducts and arcades.  They were allowed to use their materials however they chose, but they also knew if they blew through, broke, or otherwise lost a material...there were no more!  We played this up by talking about Roman taxes!  The material we saw most students destroyed...the tape!

*Side note: HUGE shout out to an amazing parent/high ability coach who helped us organize our material set up FIVE times throughout the day!  It was nothing short of an exhausting task!

Here are the materials students had access to:

One of the more interesting arcade designs using
spaghetti and marshmallows.


  • 20 strands spaghetti
  • 2 tissue boxes
  • 8 large marshmallows
  • 20 small marshmallows
  • 8 straws
  • 5 popsicle sticks
  • two long pieces of masking tape
  • one long piece of duct tape 
  • one foil pan (this was their "town")
  • one bottle filled with water
  • one small cup 
  • old textbooks (just for fun...who says textbooks can't be valuable?..wink wink!)


A countdown timer was placed on the large screen while students worked.  They divvied up group roles (material gatherer, supervisor, recorder, etc.) and set to work.

It was loud.  It was busy.  It was messy.

It was amazing.

I think I actually teared up a couple of times watching them.  While it was all of those things, what it definitely WASN'T was chaotic, obnoxious, or boring.  When students are 100% engaged, behavior becomes a bygone issue.

Everyone on task.  Everyone learning. 
We had our fair share of great successes and even greater failures.  The photo below sums up my favorite group.  They were overly ambitious, not super organized, and probably had too many chiefs. I think though- they learned more than some of the successful crews.
Having the freedom to fail brought some of the
best lessons. 
At the end of the work session, groups had the opportunity to demonstrate their aqueduct.  I loved the cooperative, encouraging atmosphere the students created for one another.  There were some tremendous flops, and it was great to see students have the ability to laugh in spite of themselves.  Groups got to share and reflect on what made them successful or not and what aspects of the project were easy/hard.  Students followed up by completing a reflection via discussion in our LMS, Canvas. Having a list of questions for students to ask themselves helped guide their reflections and made them more meaningful.

I recently had the students complete a survey to wrap up our first semester of learning (thank goodness for Google Forms).  I wanted to have their input on our classroom to better guide my instruction for the rest of the year.  One question asked students which activity stood out most and will stand the test of time (aka...they will remember it when they are my age).  Seven out of ten students mentioned this project.

So was it hard work?  Yes.  Exhausting?  Yes.  

Worth it?  Oh yeah!  

How have you incorporated STEM into your classroom?  

-Tiffany


Friday, November 13, 2015

7 Techy Ways to Build Reading Skills at Home: Guest Post for Learn2Earn

Often, we get asked to write guest blog posts for other bloggers, organizations, or companies from the edtech industry.  One of those organizations we post for is Learn2Earn.org.

Their website states that, "Learn2Earn is a technology company focused on funding education in a way that's creative, fun, and relevant." (Learn2Earn.org)

Basically, Learn2Earn provides schools an interactive platform to raise funds for their school "WHILE connecting schools, students, and families with the goal of promoting a genuine love of reading." (Learn2Earn.org)

If your school is looking for unique and education-minded fundraisers, you may want to check them out. 
While you're there be sure to check out our most recent guest blog post "7 Techy Ways to Build Reading at Home."  In this post we focus on ways parents can foster a fun, creative literacy environment at home that goes beyond just reading a book together. 

Click the image below to link in!

 Happy Reading!


Tuesday, November 10, 2015

Memes in the Classroom

Memes are one of those side effects of the digital age that you either love or hate- mostly dependent upon how you connect with the meme's content.  It's likely that your students spend a good bit of time browsing the web looking for memes that are relevant and funny to them.

Here's a quick and fun activity that capitalizes on their love for a well-written meme.  We figure if you can't beat 'em, you may as well beat 'em at their game!

The following memes are student created (sixth graders) after learning vocabulary from our Ancient Rome unit.  Students used a variety of apps to create the following memes including PicCollage, Sketchbook, and Keynote. Creativity was left to them, but they had to use a vocabulary word in such a way that demonstrated their understanding of the term.  

Think about your subject area(s) and/or content.  How can you use memes in the classroom with your students?  Be sure to post student work around the classroom!  Have a classroom Twitter account or student blogs? Share them out with the world!

Enjoy!